Replacing the MAF (mass airflow) sensor
Posted: Mon Jan 08, 2018 12:24 pm
The MAF sensor is a common cause for a MIL (check engine light). If you install an aftermarket, oiled air filter, or if you clean and over-oil your aftermarket filter, your MAF stands a good chance of being fouled and needing replacement.
This DIY rates 0 out of 8 bloody knuckles. It's a piece of cake.
Diagnosing your MAF:
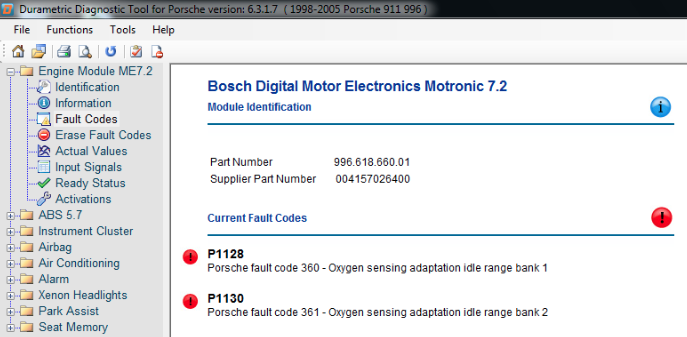
The most straightforward diagnosis is any malfunction indicator light (AKA the check engine light) indicating unexpected/out-of-range MAF values. Having both P1128 and P1130 is also a good indication that you need a new MAF, but it isn't a guarantee that the MAF is the issue. If you only have one code, do not clear it. Drive for another couple of days and check again for both P1128 and P1130.
Tools you will need:
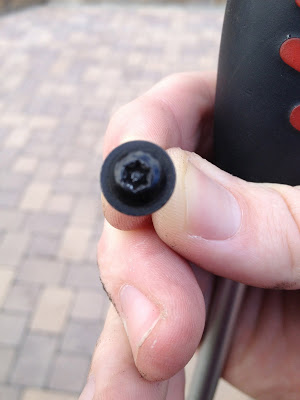
A Torx T20 security driver or screwdriver tip. See photo below. If you don't have a security torx bit or driver (the bit is hollow in the center to accept the post in the middle of the screw head), you need to find one.
No other tools are required.
You will need to obtain a new MAF. Hint: If you don't want to pay $500, go to the Bosch web site and look up which part fits your vehicle. For a 1999 Carrera 4, the part number is Bosch 0280218009, priced on Amazon at $148.02 in March 2013. Bosch warrants the MAF for 12 months, unlimited miles.
The Bosch vehicle part finder URL: boschautoparts.com/VehiclePartFinder/Pages/VehiclePartFinder.aspx
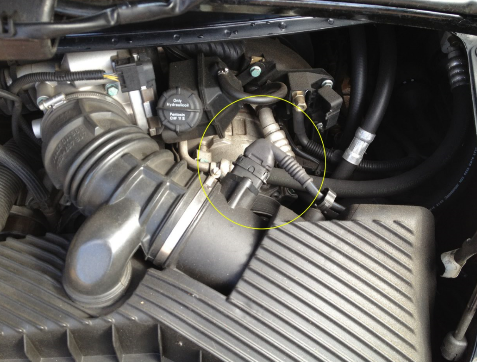
Once the new MAF is in hand, you're ready to go. Open the engine bay. The MAF is circled in the following photo:
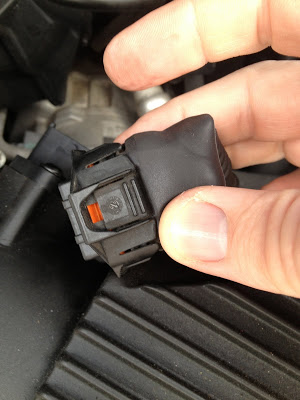
To remove the MAF, you need to pinch the top end of the back side of the connector to make it release.
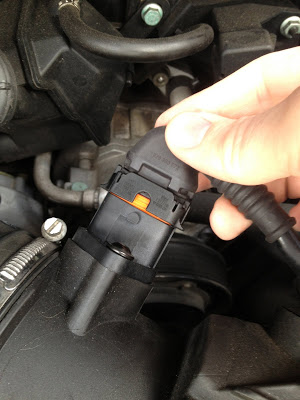
When you are pressing down in the right spot (the two parallel lines in the image below), the connector will pop off.
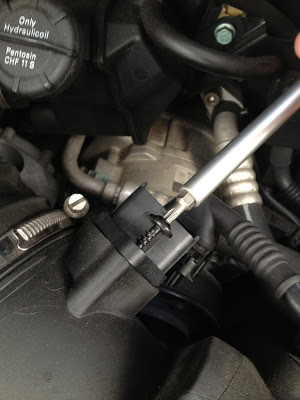
Once the electrical connector is unplugged, use your T20 driver to remove the two screws holding the MAF in place and remove the MAF from the intake.
Carefully insert the new MAF into the hole from which you removed the old one. If you don't remember which way it goes, don't worry! The hole is keyed to the shape of the MAF sensor. Once the new sensor is correctly oriented, replace and tighten the two T20 screws.
Finally, carefully plug the electrical connector into the new sensor.
That's it! Use your scantool or Durametric to clear the diagnostic codes (or disconnect the negative lead on the battery for a few minutes), and go spend some of the several hundred bucks you just saved buying the Bosch part and doing the 5-minute install on your own.
This DIY rates 0 out of 8 bloody knuckles. It's a piece of cake.
Diagnosing your MAF:
The most straightforward diagnosis is any malfunction indicator light (AKA the check engine light) indicating unexpected/out-of-range MAF values. Having both P1128 and P1130 is also a good indication that you need a new MAF, but it isn't a guarantee that the MAF is the issue. If you only have one code, do not clear it. Drive for another couple of days and check again for both P1128 and P1130.
Tools you will need:
A Torx T20 security driver or screwdriver tip. See photo below. If you don't have a security torx bit or driver (the bit is hollow in the center to accept the post in the middle of the screw head), you need to find one.
No other tools are required.
You will need to obtain a new MAF. Hint: If you don't want to pay $500, go to the Bosch web site and look up which part fits your vehicle. For a 1999 Carrera 4, the part number is Bosch 0280218009, priced on Amazon at $148.02 in March 2013. Bosch warrants the MAF for 12 months, unlimited miles.
The Bosch vehicle part finder URL: boschautoparts.com/VehiclePartFinder/Pages/VehiclePartFinder.aspx
Once the new MAF is in hand, you're ready to go. Open the engine bay. The MAF is circled in the following photo:
To remove the MAF, you need to pinch the top end of the back side of the connector to make it release.
When you are pressing down in the right spot (the two parallel lines in the image below), the connector will pop off.
Once the electrical connector is unplugged, use your T20 driver to remove the two screws holding the MAF in place and remove the MAF from the intake.
Carefully insert the new MAF into the hole from which you removed the old one. If you don't remember which way it goes, don't worry! The hole is keyed to the shape of the MAF sensor. Once the new sensor is correctly oriented, replace and tighten the two T20 screws.
Finally, carefully plug the electrical connector into the new sensor.
That's it! Use your scantool or Durametric to clear the diagnostic codes (or disconnect the negative lead on the battery for a few minutes), and go spend some of the several hundred bucks you just saved buying the Bosch part and doing the 5-minute install on your own.